Interior Finishes guide
Kitchen Backsplash Ideas for Small Kitchens: 8 Designs & Planning Tips
Explore eight backsplash looks through real photos—from timeless subway tile to bold herringbone. Find your favorite, compare the practical trade-offs, and plan how much tile to buy.
- By
- EstimatorPad Editorial Team
- Published
- October 23, 2026
- Reading time
- 14 min

Before you choose
Eight looks, one kitchen that has to work for you.
Your kitchen backsplash has a surprisingly big job for such a small surface: it needs to look right beside your cabinets, clean up easily, and fit a real shopping list. Love herringbone or glossy handmade-look tile? The cut plan, grout joints, stove-area limitations and carton coverage matter just as much as the color. Explore eight distinct backsplash designs, what each means for your project, and a worked 18.25-square-foot tile-order example.
Explore eight backsplash looks through real photos—from timeless subway tile to bold herringbone. Find your favorite, compare the practical trade-offs, and plan how much tile to buy.
- By
- EstimatorPad Editorial Team
- Published
- October 23, 2026
- Reading time
- 14 min
On this page
- 8 design ideas
- 1. Running-bond subway tile: calm and versatile
- 2. Stacked tile: a quiet contemporary grid
- 3. Herringbone: use it strategically behind the range
- 4. Zellige and handmade-look tile: texture and variation
- 5. Mosaics: pattern in a small footprint
- 6. Large-format porcelain or slab-look surface: fewer joints
- 7. Peel-and-stick panels: reversible-looking, but not universal
- 8. Glass and reflective tile: brighten carefully
- Compare the designs
- Choose for your kitchen
- Measure your wall
- Tile calculation
- Tile calculator
- Worked example
- Make the design work around real kitchen details
- Plan waste, grout, and project cost as separate decisions
- Choose grout for the actual product and joint
- FAQ
1. Running-bond subway tile: calm and versatile

At a glance
- Best suited to: a straightforward sink wall or a first-time tile layout.
- Buyer's check: grout shade, actual dimensions, trim options and manufacturer waste guidance.
- Avoid: assuming a brick pattern automatically works with an uneven countertop.
Want a backsplash that lets the countertops and cabinets do the talking? Start with a classic pattern, then change the mood with tile color and grout.
Running-bond rectangular ceramic tiles place each row's vertical joints between those on the neighboring row. A plain white tile can calm patterned countertops; muted green or soft blue can add color without covering the entire room in a loud motif. A simple glazed ceramic surface is often an approachable first tile project, though the wall, substrate and outlets still need careful preparation.
Running bond produces half-tile cuts at alternating row ends. Centering the field and dry-laying several rows helps avoid an awkward narrow strip near an exposed edge. Compare actual dimensions rather than just nominal product size. If grout contrasts with the tile, every joint becomes part of the look and out-of-level surfaces will be more visible.
2. Stacked tile: a quiet contemporary grid

At a glance
- Best suited to: simple modern cabinetry and relatively flat surfaces.
- Buyer's check: actual face height plus the chosen grout joint, not tile height alone.
- Avoid: letting the final course become a thin sliver at a very visible edge.
Sometimes you can change the entire feeling of a backsplash without changing the tile at all—just turn it and line the joints up.
Stacked tiles align their joints vertically and horizontally. Narrow vertical ceramic pieces can emphasize height, while a broad horizontal grid can make a compact run feel orderly. You can create a much different effect simply by turning the same rectangular tile, provided its maker approves the selected layout.
Aligned joints expose irregular walls and uneven counters quickly, so use a level and prepare the substrate before applying anything. Handmade tiles with irregular dimensions may be more difficult to stack into a precise grid. Compare samples from a single batch and check whether a full tile module fits the height between upper cabinets and countertop.
3. Herringbone: use it strategically behind the range

At a glance
- Best suited to: one intentionally framed feature area.
- Buyer's check: available cuts, centering, corner treatment and specialty-pattern waste.
- Avoid: choosing the pattern without planning how it terminates at cabinets and sides.
You do not need an entire wall of zigzags to give a small kitchen a focal point.
Angled rectangular pieces create a zigzag rhythm. In a small kitchen, one herringbone section behind a range can become a focal point while the rest of the backsplash remains simple. Limiting the accent is also useful for making material and labor scope explicit, although it does not make the diagonal cuts themselves simple.
Mark the center line and test the pattern on the floor or with a paper template before cutting. At a transition between herringbone and straight-set tile, check how trim and grout lines will meet. The edge offcuts may not be reusable, and some products need additional overage. Fireclay's complex-pattern guideline illustrates why ordering strictly from net wall area is risky.
Advertisement
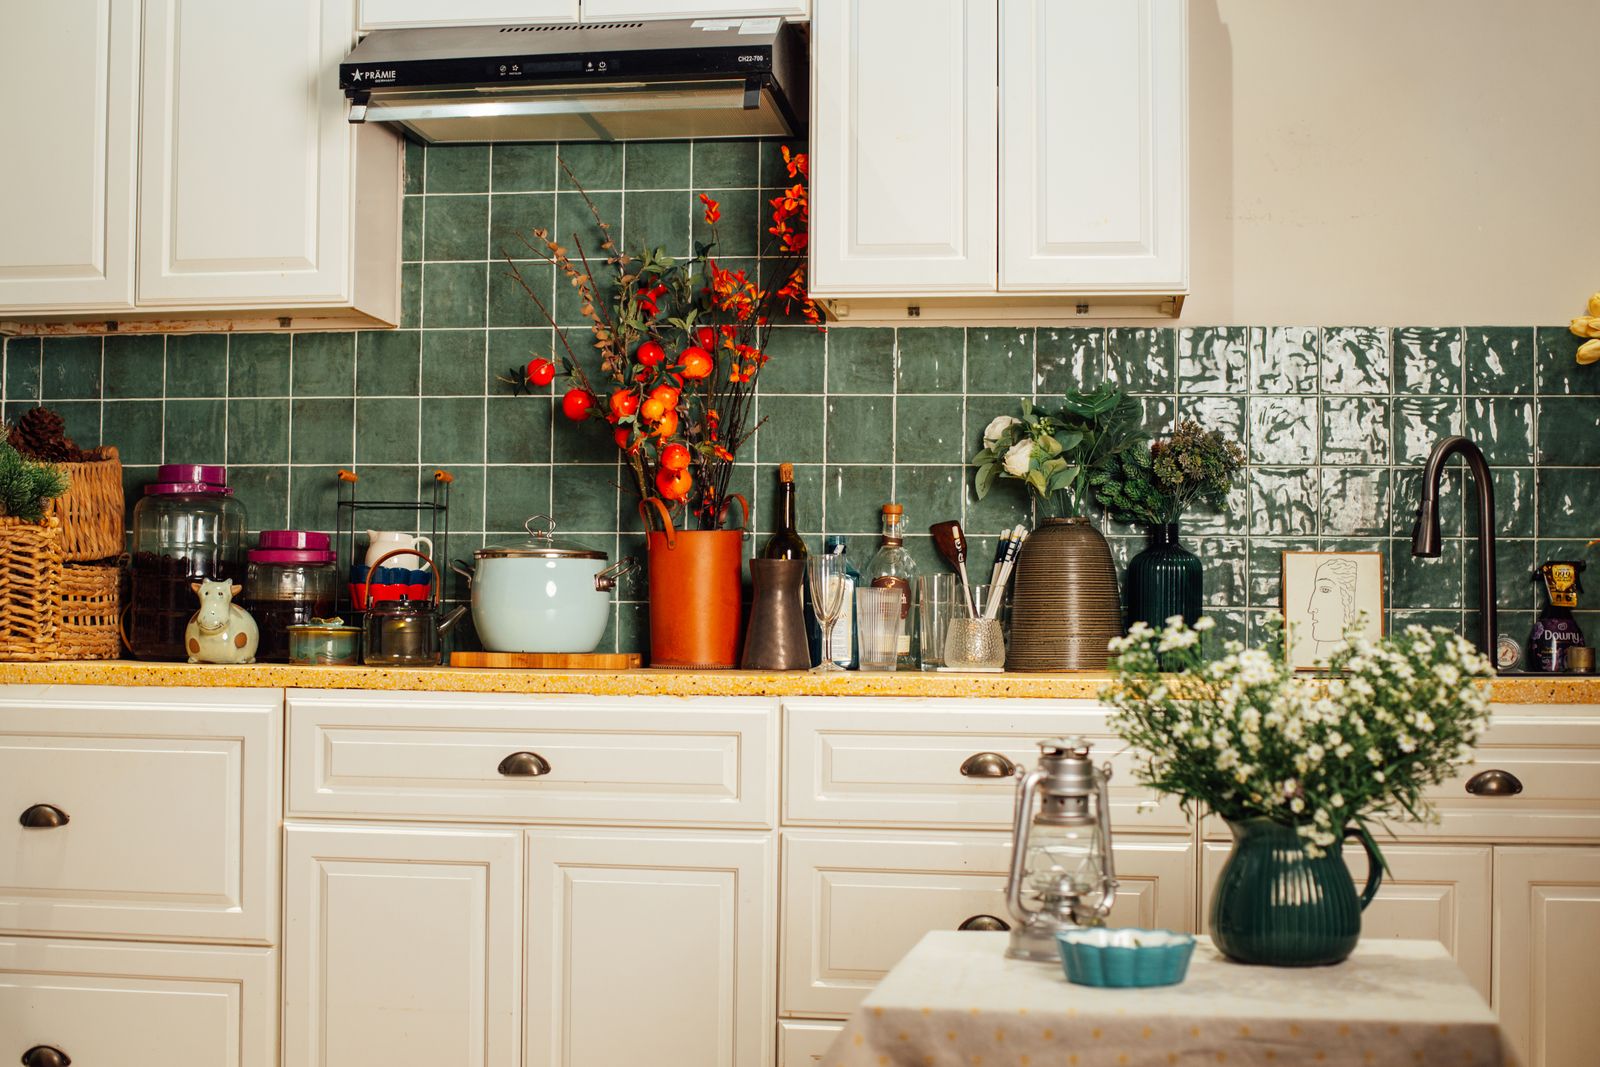
4. Zellige and handmade-look tile: texture and variation
At a glance
- Best suited to: a restrained kitchen that benefits from subtle surface character.
- Buyer's check: authentic versus handmade-look material, thickness variation and published care guide.
- Avoid: promising perfectly uniform color or assuming every zellige tile is presealed.
If a perfectly uniform wall feels too flat, the little differences between tiles can become the most interesting part.
Genuine handmade zellige brings visible differences in color, tile thickness and surface shape. A handmade-look ceramic or porcelain product may create a similar visual impression with more consistent units; the two are not interchangeable from an installation standpoint. Buy or request real samples and check whether the variation you receive matches your expectations.
Installation and sealing are product-specific. Some handmade tile may show crazing or need special preparation; do not copy a joint-width or sealing recommendation from another manufacturer's product. Lay out pieces from multiple cartons before fixing them so the strongest color differences do not form accidental patches. Ask about matching later orders from the original production lot.
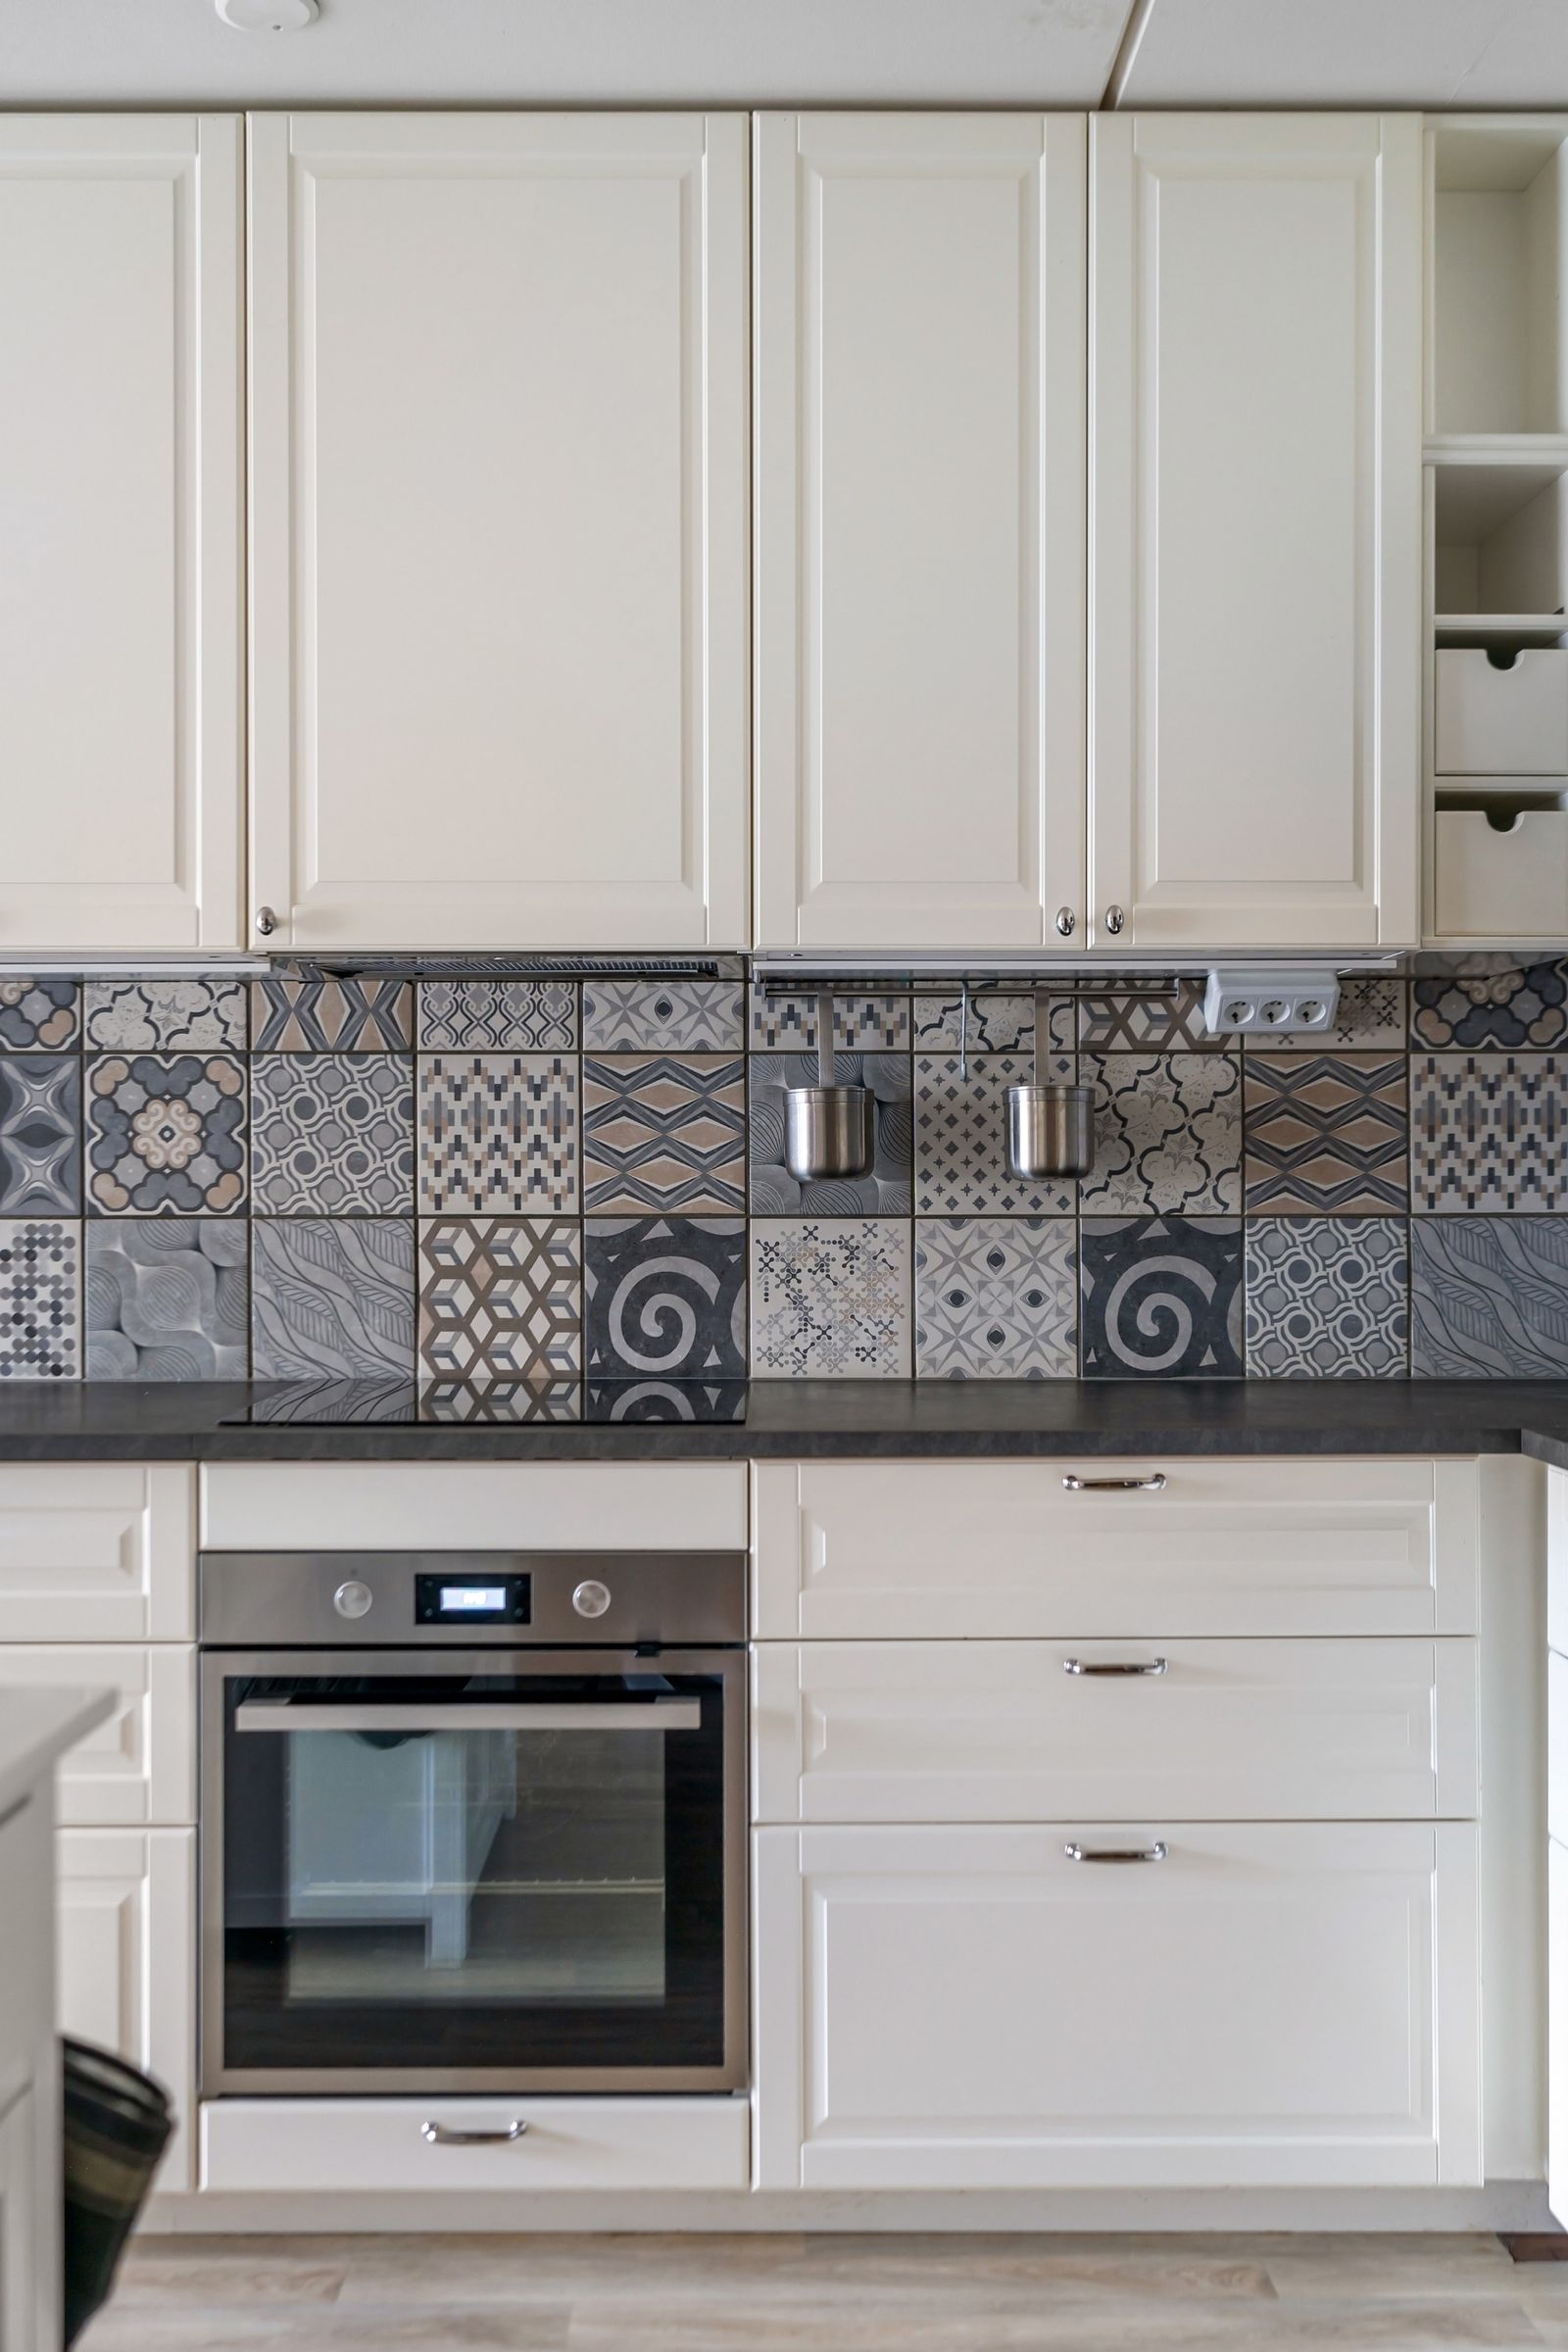
5. Mosaics: pattern in a small footprint
At a glance
- Best suited to: short walls or accent zones where fine detail is visible.
- Buyer's check: sheet yield, mesh joint spacing, grout compatibility and cleaning.
- Avoid: assuming mosaics need no planning because pieces are already attached to a sheet.
From across the kitchen, a mosaic can read as texture. Up close, every little joint becomes part of the design.
Mesh-backed sheets can bring hexagonal, kit-kat, leaf or basketweave patterns into a compact kitchen. Their scale suits small sections, but a pattern made from many little pieces creates more grout lines and a detailed cleaning job. Natural-stone mosaics may need a different sealing and cleaning routine from glazed ceramic.
Sheets are not automatically invisible after installation: poor spacing between sheets can reveal rectangular repeats. Lay several sheets next to each other and look for the repeating edge before fixing. Use the product's printed coverage per sheet, include a cutting plan around outlets, and round up to complete packages instead of extrapolating from the dimensions of one tiny chip.
6. Large-format porcelain or slab-look surface: fewer joints

At a glance
- Best suited to: homeowners prioritizing fewer visible joints over easy handling.
- Buyer's check: substrate flatness, panel handling, edge finishing and product safety instructions.
- Avoid: confusing a marble-look porcelain panel with natural marble maintenance.
Fewer grout lines can look wonderfully calm. The trade-off is that one difficult cut can matter a lot more.
A continuous stone-look surface can make a compact kitchen feel visually quieter. Large-format porcelain creates fewer grout joints, but fewer seams do not eliminate fabrication complexity. A single incorrectly cut piece can represent a significant fraction of the material purchase. Real marble needs material-specific care and may show etching from acidic splashes.
Measure the wall for flatness and plan openings before selecting the final format. Confirm delivery, handling, cut capability, and the possibility of breakage. A generic percentage allowance may not be enough when one extra full tile or panel is the meaningful purchasing unit. Large panels are a good place to ask a qualified installer for a scaled cut plan.
7. Peel-and-stick panels: reversible-looking, but not universal

At a glance
- Best suited to: limited-scope refreshes where the product is appropriate for the site.
- Buyer's check: heat rules, substrate compatibility, cured paint and pattern repeat.
- Avoid: placing an unapproved adhesive surface behind a hot range.
A quick kitchen refresh is tempting, especially when a full renovation is out of reach. But the label on the back of the panel matters more than the before-and-after photo.
Adhesive vinyl, gel and metal-look sheets offer a simpler surface transformation for some walls, particularly where owners cannot undertake a full wet-tile installation. They still differ in heat limits, substrate requirements, paint-curing guidance, removability and cleaning methods. Removable-looking products are not automatically damage-free for every rental wall.
Check the exact product's stove clearances rather than relying on a social-media before-and-after. Some products prohibit use near cooktops. Surface prep matters: grease, poorly bonded paint or moisture can cause poor adhesion. If you rent, check the lease and test removal in an inconspicuous location where permitted. Work out panel count using the brand's actual coverage and pattern overlap.
8. Glass and reflective tile: brighten carefully

At a glance
- Best suited to: kitchens needing light reflection with a simple cabinet palette.
- Buyer's check: manufacturer-approved mortar/grout and scratch resistance.
- Avoid: using ceramic-tile installation assumptions without reading the glass product guide.
A reflective backsplash can pick up light from a window or under-cabinet fixture. It can also reflect every smudge.
Glass and mirror-finish tile can reflect light from a window or under-cabinet fixture. A pale green glass subway can feel understated; a strongly mirrored finish can create glare and expose fingerprints. In a small space, position a sample where it will be installed and view it at different hours rather than choosing solely from polished marketing photos.
Some glass products require compatible setting materials or grout types to protect the finish and ensure bonding. Verify the product instructions before ordering and request installer advice where needed. Calculate by actual box coverage and account for cut pieces at window returns, outlets and the exposed ends of the run.
Advertisement
Which backsplash design fits your project?
Qualitative planning comparison; difficulty depends on site conditions and product instructions.
| Design | Most useful when | Main limitation |
|---|---|---|
| Running-bond subway | Straightforward, timeless sink-wall field | Repeating end cuts and visible grout |
| Stacked tile | Minimal, modern cabinet style | Aligned joints expose uneven surfaces |
| Herringbone | Distinct range-wall focal point | Many diagonal cuts |
| Zellige or handmade-look | Variation and reflective texture | Care, size and batch differences |
| Mosaic sheets | Decorative small feature area | Many joints and visible sheet seams |
| Large-format slab look | Fewer visible joints | Handling and cut planning |
| Peel-and-stick | Low-commitment updates | Product-specific heat and prep limits |
| Glass tile | Light reflection and color | Adhesive and grout compatibility |
Start with the kitchen, not a trendy tile
A saved kitchen photo can tell you what looks beautiful. It cannot tell you how that tile will look beside your own cabinets, or where the cuts will land.
Before looking at a showroom wall, photograph the kitchen straight on and draw the backsplash boundaries. A narrow galley with short cabinet-to-counter runs needs a different layout strategy from a kitchen with a tall range wall. If your space receives little light, samples held against the cabinets in daytime will tell you more than an isolated product photo.
Check how often the wall is splashed with grease or water and which products your household uses to clean it. Color, gloss and pattern matter, but the real difference after installation is often whether the grout and surface are practical to maintain. Order samples and place them beside the actual countertop and cabinet finish.
From inspiration to installation
Found your favorite? Now plan the tile.
Before ordering, measure the real wall, check the product’s heat and cleaning guidance, and plan for layout cuts. The next steps turn the style you saved into a useful material estimate.
See how to measure →Measurement steps
How to measure
- Sketch each section between countertop, cabinets, hood, windows and range separately; mark inside and outside corners.
- Measure each wall segment's tiled width and height in inches at multiple locations; preserve the actual dimensions, including returns.
- Multiply the dimensions of each zone and divide square inches by 144 to obtain square feet; add separate zones once.
- Do not deduct ordinary outlet openings as if no cutting were required. Verify local electrical box extension details independently.
- Sketch the chosen tile layout around visible edges and outlets to evaluate the likely usable cut pieces.
- Read actual tile dimensions and carton or sheet coverage from your chosen product, then apply a justified overage and round packaging upward.
- Record grout width, product thickness, substrate condition and heat-location limitations before the final order.
Formula explanation
The formulas to use
Net backsplash area_sq_ft = sum((zone_width_in x zone_height_in) / 144) - excluded_area_sq_ft
Illustrative order area_sq_ft = measured_area_sq_ft x (1 + chosen waste fraction)
Whole cartons = ceiling(order_area_sq_ft / verified carton coverage_sq_ft)
Optional unit count = ceiling(order_area_sq_ft / actual tile coverage_sq_ft); packaging may still require carton rounding
Use with this article
Tile Calculator
Enter the article's measurements and assumptions to check the rounded planning estimate.
Open calculatorProject cluster
Interior planning pages
Open the full hub when you need the matching calculator, sibling guides, and related material estimates in one place.
Worked example
A two-zone backsplash with 18.25 sq ft of tile
- 1Under the upper cabinets: 96 in wide x 18 in high = 1,728 sq in, or 12.00 sq ft.
- 2Behind a range: 30 in wide x 30 in high = 900 sq in, or 6.25 sq ft.
- 3Assuming these zones do not overlap, combined measured area = 18.25 sq ft.
- 4Using a hypothetical carton coverage of 3.5 sq ft and a 10% scenario: 18.25 x 1.10 = 20.075 sq ft; ceiling(20.075 / 3.5) = 6 cartons.
- 5At 15%: 18.25 x 1.15 = 20.9875 sq ft; ceiling(20.9875 / 3.5) = 6 cartons, purchasing 21.0 sq ft.
- 6At 20%: 18.25 x 1.20 = 21.9 sq ft; ceiling(21.9 / 3.5) = 7 cartons, purchasing 24.5 sq ft.
For this hypothetical product, 10% and 15% scenarios both round to six cartons, while 20% rounds to seven. Six cartons leave almost no surplus above a 15% target. The actual tile's carton yield and cutting plan must determine the order.
Open the Tile Calculator at /tile-calculator, enter each measured tile area, choose the selected product's actual box coverage and the appropriate waste rate, then compare whole cartons. The worked figures assume 3.5 sq ft per hypothetical carton.
Carton rounding changes the order
Hypothetical 18.25 sq ft backsplash and hypothetical 3.5 sq ft per carton; actual purchasing depends on product and cuts.
| Example overage | Required area | Whole cartons | Coverage purchased |
|---|---|---|---|
| 10% | 20.075 sq ft | 6 | 21.0 sq ft |
| 15% | 20.9875 sq ft | 6 | 21.0 sq ft |
| 20% | 21.9 sq ft | 7 | 24.5 sq ft |
Advertisement
Make the design work around real kitchen details
The beautiful tile is what you notice first. The awkward cut around an outlet is what you might notice every day afterward.
An outlet, window reveal, corner or sloped countertop often determines the final visual quality more than the tile color. Draw the field to scale and center the pattern in the most visible area. Test partial courses with the real tile and the intended grout gap so the row next to the upper cabinets does not end in a tiny offcut.
Electrical work is not a decorative finishing step. Turn off electrical power before approaching outlet covers and use a qualified electrician for box modifications or when local requirements are uncertain. The tile's thickness may affect box placement and extension needs. Leave appropriate movement joints and use product-approved flexible sealant at changes of plane; follow the installation system rather than applying grout to every seam.
Plan waste, grout, and project cost as separate decisions
This is the part where a beautiful mood board becomes an actual shopping list.
First calculate the measured tiled area. Next choose an overage appropriate to the material and pattern, and finally round to cartons or full sheets. A small wall can be particularly sensitive to carton rounding: the example's 15% allowance nearly fills six hypothetical 3.5-square-foot cartons, leaving little room for extra miscuts.
Don't confuse the tile bill with the total backsplash project. A useful local quote also lists setting adhesive, grout, sealant, any needed primer, edging and trim, electrical coordination, disposable supplies and labor. Rather than copying a retailer's current price into a supposedly evergreen estimate, multiply your actual planned purchase coverage by the supplier's quoted unit price, then keep other lines separate.
Under-cabinet run
96 in x 18 in
12.00 sq ft
Separate range wall
30 in x 30 in
6.25 sq ft
Measured total: 18.25 sq ft before pattern waste
Choose grout for the actual product and joint
Grout is not just what fills the gaps. It can either quiet a tile pattern or make every edge stand out.
Grout color changes how a small pattern reads. Matching grout tones make the surface calmer; contrasting joints emphasize geometry and make uneven spacing more obvious. Test grout samples beside the installed tile if you can. Confirm whether the grout requires sealing and the manufacturer's cure time before exposure to moisture and cleaning.
Grout quantity depends on joint width, tile face dimensions and thickness, not just total square footage. Use the EstimatorPad Tile Grout Calculator at /tile-grout-calculator alongside the manufacturer's coverage chart, and do not assume the same grout suits delicate glass, soft stone and rugged porcelain. The grout calculator is a material planning tool, not a product compatibility approval.
Ordering margin
Waste and ordering margin
- Fireclay Tile advises at least 15% overage for its typical tile orders and at least 20% for complex patterns; these are that manufacturer's recommendations, not universal purchase rules.
- Before choosing 10%, 15%, or 20% as a scenario, ask your tile supplier what applies to the exact product, stock sizes and cutting pattern.
- With small projects, carton rounding can change the purchase quantity more than small differences in the waste percentage.
- Calculate separate line items for accent tiles, trim, grout, caulk, adhesive, installation tools and any repairs or spare stock.
Avoid these
Common mistakes
- Picking a gallery photo without considering the true tile material, surface cleaning requirements, cabinet color or available light.
- Assuming the nominal tile size is its exact installed dimension, then discovering a sliver cut at the top.
- Using a generic waste allowance as though it were confirmed for a complicated layout.
- Assuming every peel-and-stick panel is suitable behind a cooktop or across freshly painted walls.
- Using the same adhesive and grout for glass, natural stone and ceramic without product-specific instructions.
- Adjusting electrical boxes without understanding the applicable safety rules or qualified electrical requirements.
Project checklist
Before you use the result
- Choose at most two coordinating finishes and view physical samples alongside cabinets and countertops.
- Measure each surface separately and photograph every outlet, corner and reveal.
- Confirm whether the selected tile is appropriate near the stove and in splash zones.
- Select grout appearance and test against the actual tile, with product-specific compatibility.
- Draw several full courses with real face sizes, movement gaps and manufacturer-required joints.
- Get accurate carton or sheet coverage and confirm current lot availability.
- Estimate tile area, waste and whole cartons with the Tile Calculator.
- Estimate grout separately using actual tile thickness and joint width.
- Budget adhesive, movement-joint sealant, trim, tools and labor beyond tile coverage.
- Confirm electrical changes, substrate preparation and specialty cuts with a qualified professional where needed.
Estimate disclaimer
Verify before buying or building.
Design examples and carton calculations are for planning, not a product-specific installation specification. Follow manufacturer installation, heat-clearance, care and code requirements; have a qualified professional check any electrical or specialty substrate work.
FAQ
Common questions
01What backsplash is easiest for a first-time tiler?+
A simple running-bond or stacked ceramic layout on a properly prepared flat wall can be approachable. The complexity of outlets, corners and the substrate still matters.
02How much tile does an 18.25 sq ft backsplash need?+
Measured area alone is 18.25 sq ft; a 15% example allowance gives 20.9875 sq ft, which rounds to six hypothetical 3.5-sq-ft cartons. Actual coverage and waste requirements depend on the chosen product.
03Can peel-and-stick tile be used behind a stove?+
Only where the exact panel's manufacturer allows it. Heat-clearance and surface-preparation instructions differ and should not be replaced by a generic claim.
04Should grout match the tile?+
Matching grout usually makes joints less prominent, while contrasting grout emphasizes pattern. The grout type and care must still suit the actual tile and joint width.